Mage Training Arena
Introduction | Location | Requirements | Recommended Items
Telekinetic Theatre | Alchemists' Playground | Enchanting Chamber | Creature Graveyard
Rewards | Development Team
Telekinetic Theatre | Alchemists' Playground | Enchanting Chamber | Creature Graveyard
Rewards | Development Team
The Mage Training Arena is only accessible to RuneScape Members. Please subscribe to get this feature.
Please note this is a 'Safe' activity. If you die during this activity, you will retain all of your items.
Introduction

Within this building, you can gain Magic experience through four activities, as well as earn points to trade for items in the Mage Training Arena shop.
In each of the four rooms in the Arena (accessible via the teleports towards the back of the building), you will be able to earn 'Pizazz Points' specific to each room:
- Telekinetic Pizazz Points from the Telekinetic Theatre
- Alchemist Pizazz Points from the Alchemists' Playground
- Enchantment Pizazz Points from the Enchanting Chamber
- Graveyard Pizazz Points from the Creature Graveyard
![[image]](../../img/main/kbase/minigames/mage_training/exit_portal.gif) There is no time limit in each room, so you can collect as many points as you wish before you exit through the portals.
There is no time limit in each room, so you can collect as many points as you wish before you exit through the portals.
To start your career in the Mage Training Arena, you need to have a word with the Entrance Guardian.
He will give you an introduction to the Arena and, most importantly, supply you with a special hat to help record your progress (which you can regain from him for free should you ever lose it).
![[image]](../../img/main/kbase/minigames/mage_training/mage_trainingbook.gif) With these points you can travel up the stairs from the entrance hall of the Arena to find the Rewards Guardian. See the end of this guide for the rewards you can claim. You can also buy an arena book from the Rewards Guardian for 200gp. This will give you advice on using the different rooms.
With these points you can travel up the stairs from the entrance hall of the Arena to find the Rewards Guardian. See the end of this guide for the rewards you can claim. You can also buy an arena book from the Rewards Guardian for 200gp. This will give you advice on using the different rooms.
If you die in the four rooms within the Arena you will be teleported to the entrance and retain all the items you entered with. You will, however, lose any items specific to the Mage Arena itself. This includes any money that you have created in the Alchemists' Playground and Pizazz Points for the coins created. Logging out while in the Mage Arena will result in your character being teleported to the entrance upon logging into the game again.
The Pizazz Progress Hat
In order to access each room, you will need the Pizazz Progress Hat in your inventory or on your head.There is a maximum number of points that you can gain using a Progress Hat. However, after you have reached this limit you can still train in the different rooms but you won't gain any more points. These limits are:
| Graveyard Pizazz Points | 4,000 |
| Telekinetic Pizazz Points | 4,000 |
| Alchemist Pizazz Points | 8,000 |
| Enchantment Pizazz Points | 16,000 |
Take note, that if you should choose to destroy your Pizazz Progress Hat, you will also lose all your Pizazz Points.
The Pizazz Progress Hat will glow brighter in order to show you how many points you have gained and how many you can still earn. There are three stages - dull, energised and full.
Location


Requirements
Each room will require you to use different spells in order to complete the task and gain the Pizazz Points, but you only need the lowest level required to enter each portal. For information on which runes you require in order to cast a spell, please see the Battle Spells and the Non Combat section of the Magic Guide.
It is worth noting that you cannot bring any items that will help you in the training rooms. For example, you cannot bring coins into the alchemist room and bananas or peaches into the Creature Graveyard. Also, you cannot bring these items out of the room - by death or teleportation for example.
Please note, due to the ease of casting the 'enchant' spells, you may find the experience you get is slightly reduced.
| Room | Spell | Levels required |
| Telekinetic Theatre | ![[image]](../../img/main/kbase/skills/magic/spells/telekinetic_grab1.gif) Telekinetic Grab Telekinetic Grab |
33 |
| Room | Spell | Levels required |
| Alchemist's Playground | ![[image]](../../img/main/kbase/skills/magic/spells/low_level_alchemy1.gif) Low Alchemy Low Alchemy |
21 |
![[image]](../../img/main/kbase/skills/magic/spells/high_level_alchemy1.gif) High Alchemy High Alchemy |
55 |
| Room | Spell | Levels required |
| Enchanting Chamber | ![[image]](../../img/main/kbase/skills/magic/spells/lvl_1_enchant1.gif) Enchant EnchantLevel 1 Jewellery |
7 |
![[image]](../../img/main/kbase/skills/magic/spells/lvl_2_enchant1.gif) Enchant EnchantLevel 2 Jewellery |
27 |
|
![[image]](../../img/main/kbase/skills/magic/spells/lvl_3_enchant1.gif) Enchant EnchantLevel 3 Jewellery |
49 |
|
![[image]](../../img/main/kbase/skills/magic/spells/lvl_4_enchant1.gif) Enchant EnchantLevel 4 Jewellery |
57 |
|
![[image]](../../img/main/kbase/skills/magic/spells/lvl_5_enchant1.gif) Enchant EnchantLevel 5 Jewellery |
68 |
|
![[image]](../../img/main/kbase/skills/magic/spells/lvl_6_enchant1.gif) Enchant EnchantLevel 6 Jewellery |
87 |
| Room | Spell | Level Required |
| Creature Graveyard | ![[image]](../../img/main/kbase/skills/magic/spells/bones_to_bananas1.gif) Bones To Bananas Bones To Bananas |
15 |
![[image]](../../img/main/kbase/skills/magic/spells/bones_to_peaches1.gif) Bones To Peaches Bones To Peaches |
60 |
Recommended Items
To complete this activity we recommend you take the following items with you:
| Item | Obtained From | Use in Mage Training Arena |
![[image]](../../img/main/kbase/minigames/mage_training/progresshat_dull.gif) Progress Hat Progress Hat |
This item is given to you when you first speak to the Entrance Guardian in the Mage Training Arena. | This is an essential item when taking part in this activity. When spoken to, this item will tell you the amount of Enchantment, Telekinetic, Alchemist and Graveyard Pizazz Points you have gained. |
![[image]](../../img/main/kbase/items/runes/lrune.gif) Runes Runes |
These items can be bought from stores, crafted by players or found as monster drops. | These are needed to cast the spells used in the different rooms. |
![[image]](../../img/main/kbase/items/rings/emering.gif) Ring Of duelling Ring Of duelling |
These items are player made. | This item has the ability to teleport you to the Duel Arena which is just a short distance from the mage Training Arena. For information on how to make a ring of duelling please see the Crafting Guide. To enchant the ring see the Magic Guide. |
Telekinetic Theatre

For example, to move the statue north, stand on the north edge of the maze. To move the statue west, stand on the west side of the maze. You cannot move the statue diagonally or by standing at a corner of the maze.
The statue will only stop moving when a barrier gets in its way. It is your aim to move the statue around these barriers
If you leave the Telekinetic Theatre while in the middle of a maze, you will return find a different maze, with the statue reset to its starting position.
The statue has the option 'Observe'. By selecting this, the camera view will change for a better view of the maze, making the task easier. Selecting this option again will return the camera back to your control. The view will also return to your control should you walk a certain distance away from the perimeter of the maze.
Once you manage to complete a maze, you will be rewarded with 2 Telekinetic Pizazz Points. The statue that you managed to guide to the exit will change into a guardian that you can talk to. Talk to him and he will teleport you to the next maze.
![[image]](../../img/main/kbase/minigames/mage_training/telekinetic_theatre_count.gif) In the corner of the screen you will see a number - this counts the number of mazes that you've completed in a row. By completing five mazes in a row, you will be rewarded with 8 bonus Telekinetic Pizazz Points, 1,000 Magic XP and ten law runes. To complete a maze uses, on average, 8.3 air runes and 8.3 law runes, for which you will receive 2 Pizazz Points.
In the corner of the screen you will see a number - this counts the number of mazes that you've completed in a row. By completing five mazes in a row, you will be rewarded with 8 bonus Telekinetic Pizazz Points, 1,000 Magic XP and ten law runes. To complete a maze uses, on average, 8.3 air runes and 8.3 law runes, for which you will receive 2 Pizazz Points.
The number of mazes that you have completed will be stored, so if you log out or leave the area you can continue where you left off.
Alchemists' Playground

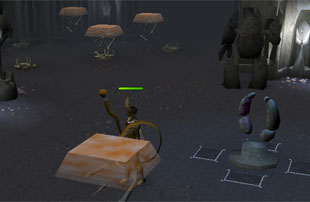
In this room there is a guardian (who will give you any advice that you may need), eight cupboards (see image above), and a hole in the wall in which to deposit coins. In the cupboards can be found five different items: leather boots, adamant kite shields, adamant medium helms, emeralds and rune long swords. The location of each object changes periodically. The monetary reward from these items will change, with the values of the items fluctuating from 1,5,8,15, or 30 coins, regardless of whether you use the Low or High Alchemy spells. Using the High Alchemy spell will give you more experience but no more money than the Low Alchemy spell.
The items you find in this room cannot be taken out, nor can they be worn or traded.
There is a list in the top right-hand corner that will display the individual costs of items (see the image above), and occasionally a green arrow will appear next to one of the items (in the image above the green arrow points to the adamant kiteshield). This indicates that it will cost no runes to convert that item.
So, it's your task to find the items in the cupboards and convert them at the right time in order to make as many coins as possible. It is also beneficial to hunt for the item indicated by the green arrow as this will allow you to gain experience and Pizazz Points for using no runes to cast the spell!
You must deposit these coins in the receptacle at the back of the room. This will reward you with Pizazz Points (1% of the coins deposited), Magic experience (the number of coins multiplied by two), and 10% of the converted coins that will be deposited straight into your bank once you leave the Alchemists' Playground. If you decide to exit the room before depositing the coins, you will not get your Pizazz Points or the bonus coins into your bank. You will be warned when you try to exit too.
Enchanting Chamber

There are four types of shape found within this room: cubes, pentamids, icosahedrons, and cylinders.
![[image]](../../img/main/kbase/minigames/mage_training/mage_object_yellow.gif) Cube Cube |
![[image]](../../img/main/kbase/minigames/mage_training/mage_object_red.gif) Pentamid Pentamid |
![[image]](../../img/main/kbase/minigames/mage_training/mage_object_blue.gif) Icosahedron Icosahedron |
![[image]](../../img/main/kbase/minigames/mage_training/mage_object_green.gif) Cylinder Cylinder |
![[image]](../../img/main/kbase/minigames/mage_training/enchant_shape.gif) All of these items can be picked up and used with any of the enchantment spells in order to turn them into white spheres. These white spheres can then be deposited in the receptacle on the podium in the centre of the room. You can either deposit each item individually or all at once by right-clicking and selecting the 'Deposit' option on the hole.
All of these items can be picked up and used with any of the enchantment spells in order to turn them into white spheres. These white spheres can then be deposited in the receptacle on the podium in the centre of the room. You can either deposit each item individually or all at once by right-clicking and selecting the 'Deposit' option on the hole.
![[image]](../../img/main/kbase/minigames/mage_training/mage_object_orb.gif) For every twenty spheres deposited you will receive either three cosmic runes, three blood runes, or three death runes (chosen at random). For every ten shapes converted, you get bonus points. Enchanting a shape that is indicated in the corner of the screen will provide you with a bonus point (irrespective of shape or spell). The number of bonus points depends on the level of your enchantment spell - so it's best to use the highest level possible to convert the tenth object if you're trying to collect points. Enchanting the shapes provides the following rewards/costs:
For every twenty spheres deposited you will receive either three cosmic runes, three blood runes, or three death runes (chosen at random). For every ten shapes converted, you get bonus points. Enchanting a shape that is indicated in the corner of the screen will provide you with a bonus point (irrespective of shape or spell). The number of bonus points depends on the level of your enchantment spell - so it's best to use the highest level possible to convert the tenth object if you're trying to collect points. Enchanting the shapes provides the following rewards/costs:
| Enchantment Spell Level | Points for Dragonstone |
Points for Ordinary Objects |
Bonus Points On 10th Item |
| 1 | 2 | 1 | 1 |
| 2 | 4 | 1 | 2 |
| 3 | 6 | 1 | 3 |
| 4 | 8 | 1 | 4 |
| 5 | 10 | 1 | 5 |
| 6 | 12 | 1 | 6 |
Creature Graveyard
The different piles of bones will offer different types of bones, which in turn will provide you with various numbers of bananas and peaches once you cast the conversion spells. For each pile of bones, once you have picked up four bones from a type of bone pile, it will change to a different type of pile.
For every sixteen bananas that are deposited in the walls you will be awarded with either a water, earth, nature, death or blood rune, a Graveyard Pizazz Point and 25 Magic experience. If you do happen to die in the Creature Graveyard you will lose 10 Graveyard Pizazz Points as a penalty.
| Bone Pile | Inventory Object | No.of Bananas/Peaches from spell |
![[image: a form of bone pile]](../../img/main/kbase/minigames/mage_training/bonepile4.gif "a form of bone pile") |
![[image: bones received from that bone pile]](../../img/main/kbase/minigames/mage_training/mage_bones1.gif "bones received from that bone pile") |
1 |
![[image: a form of bone pile]](../../img/main/kbase/minigames/mage_training/bonepile3.gif "a form of bone pile") |
![[image: bones received from that bone pile]](../../img/main/kbase/minigames/mage_training/mage_bones2.gif "bones received from that bone pile") |
2 |
![[image: a form of bone pile]](../../img/main/kbase/minigames/mage_training/bonepile2.gif "a form of bone pile") |
![[image: bones received from that bone pile]](../../img/main/kbase/minigames/mage_training/mage_bones3.gif "bones received from that bone pile") |
3 |
![[image: a form of bone pile]](../../img/main/kbase/minigames/mage_training/bonepile1.gif "a form of bone pile") |
![[image: bones received from that bone pile]](../../img/main/kbase/minigames/mage_training/mage_bones4.gif "bones received from that bone pile") |
4 |
Rewards
You can exchange the Pizazz Points you have gained in each room by going upstairs at the entrance, using either the right or left staircase. Go to the back of the room and you will find the Rewards Guardian. Talk to him and you will be able to exchange your points for the following things:
| Clothes | Pizazz Points | |||
| Telekinetic | Alchemist | Enchantment | Graveyard | |
![[image]](../../img/main/kbase/armour/mage/infinity_boots.gif) Infinity Boots Infinity Boots |
120 | 120 | 1200 | 120 |
![[image]](../../img/main/kbase/armour/mage/infinity_gloves.gif) Infinity Gloves Infinity Gloves |
175 | 225 | 1500 | 175 |
![[image]](../../img/main/kbase/armour/mage/infinity_hat.gif) Infinity Hat Infinity Hat |
350 | 400 | 3000 | 350 |
![[image]](../../img/main/kbase/armour/mage/infinity_robetop.gif) Infinity Top Infinity Top |
400 | 450 | 4000 | 400 |
![[image]](../../img/main/kbase/armour/mage/infinity_robebottom.gif) Infinity Robe Infinity Robe |
450 | 500 | 5000 | 450 |
To view the level requirements for the above items, please see Wizardly Attire in the Magic section of the Manual.
| Runes | Pizazz Points | |||
| Telekinetic | Alchemist | Enchantment | Graveyard | |
![[image]](../../img/main/kbase/items/runes/mistrune.gif) Mist rune Mist rune |
1 | 1 | 15 | 1 |
![[image]](../../img/main/kbase/items/runes/dustrune.gif) Dust rune Dust rune |
1 | 1 | 15 | 1 |
![[image]](../../img/main/kbase/items/runes/mudrune.gif) Mud rune Mud rune |
1 | 1 | 15 | 1 |
![[image]](../../img/main/kbase/items/runes/smokerune.gif) Smoke rune Smoke rune |
1 | 1 | 15 | 1 |
![[image]](../../img/main/kbase/items/runes/steamrune.gif) Steam rune Steam rune |
1 | 1 | 15 | 1 |
![[image]](../../img/main/kbase/items/runes/lavarune.gif) Lava rune Lava rune |
1 | 1 | 15 | 1 |
![[image]](../../img/main/kbase/items/runes/nrune.gif) Nature rune Nature rune |
0 | 1 | 0 | 1 |
![[image]](../../img/main/kbase/items/runes/crune.gif) Cosmic rune Cosmic rune |
0 | 0 | 5 | 0 |
![[image]](../../img/main/kbase/items/runes/chrune.gif) Chaos rune Chaos rune |
0 | 1 | 5 | 1 |
| Law rune |
2 | 0 | 0 | 0 |
![[image]](../../img/main/kbase/items/runes/death_rune.gif) Death rune Death rune |
2 | 1 | 20 | 1 |
![[image]](../../img/main/kbase/items/runes/srune.gif) Soul rune Soul rune |
2 | 2 | 25 | 2 |
![[image]](../../img/main/kbase/items/runes/blrune.gif) Blood rune Blood rune |
2 | 2 | 25 | 2 |
| Miscellaneous Rewards |
Pizazz Points | |||
| Telekinetic | Alchemist | Enchantment | Graveyard | |
![[image]](../../img/main/kbase/weapons/mage/nonbattlestaff/plainstaff2.gif) Battlestaff Battlestaff |
1 | 2 | 20 | 2 |
![[image]](../../img/main/kbase/minigames/mage_training/beginner_wand.gif) Beginner Wand Beginner Wand |
30 | 30 | 300 | 30 |
![[image]](../../img/main/kbase/minigames/mage_training/apprentice_wand.gif) Apprentice Wand Apprentice Wand |
60 | 60 | 600 | 60 |
![[image]](../../img/main/kbase/minigames/mage_training/teacher_wand.gif) Teacher Wand Teacher Wand |
150 | 200 | 1500 | 150 |
![[image]](../../img/main/kbase/minigames/mage_training/master_wand1.gif) Master Wand Master Wand |
240 | 240 | 2400 | 240 |
![[image]](../../img/main/kbase/minigames/mage_training/mages_book.gif) Mages' Book Mages' Book |
500 | 550 | 6000 | 500 |
| Bones To Peaches |
200 | 300 | 2000 | 200 |
To view the level requirements for the above items, please see Magical Equipment in the Magic section of the Manual.
Note: When purchasing the wands, you have to buy the beginner wand first. With that in your inventory you can purchase the apprentice wand, and so on, upgrading the wand. If you were to lose an upgraded wand, you would have to start at the beginner level again.
Development Team
Developer: Tim C
Graphics: Neil R
QA: Ben L
Audio: Ian T

More articles in
Activities
|
|
|
Further Help
Need more help? Come chat with us!
|
|

