mirror of
https://gitlab.com/kelteseth/ScreenPlay.git
synced 2024-09-01 16:19:47 +02:00
4.7 KiB
4.7 KiB
Developer Setup
- Install latest git + git-lfs
- Install python 3
- Clone ScreenPlay
git clone --recursive https://gitlab.com/kelteseth/ScreenPlay.git ScreenPlay
- Download the latest Qt 6.2.x for you platform. Earlier versions are not supported!
- Start the following script to download all needed dependencies automatically. This will create a ScreenPlay-vcpkg folder in the same directory as your ScreenPlay source folder.
cd Tools
py setup.py
- This will install these dependencies via vcpkg
- openSSL
- sentry-native
- doctest
- infoware
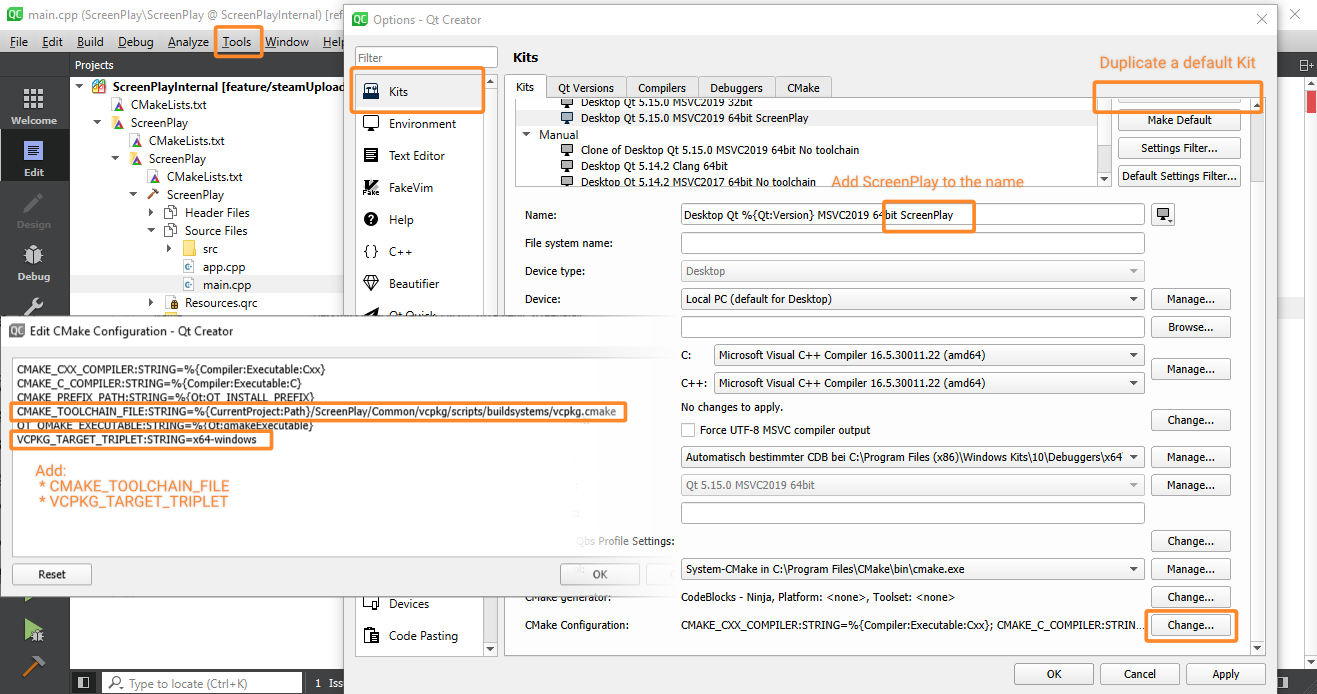
- Open QtCreator and open the settings
Tools -> Options - Clone an existing kit like
Qt 6.2.1 MSVC2019 64bitand addScreenPlayto the new kit name - Edit CMake variables amd add CMAKE_TOOLCHAIN_FILE and VCPKG_TARGET_TRIPLET
Kits -> <Your_Kit> -> CMake Configuration
Append this:
CMAKE_TOOLCHAIN_FILE:STRING=%{CurrentProject:Path}/../ScreenPlay-vcpkg/scripts/buildsystems/vcpkg.cmake
# Only _one_ of these lines that match your OS:
VCPKG_TARGET_TRIPLET:STRING=x64-windows
VCPKG_TARGET_TRIPLET:STRING=x64-linux
VCPKG_TARGET_TRIPLET:STRING=x64-osx
- Save and close the settings.
- Open Project via
File -> Open File or Projectand select yourCMakeLists.txt. Then select our created kit, pressConfigure Project

Windows
- It is recommended (but not necessary) to use an easy git UI like gitextensions.
- Download and install the most recent MSVC 2019 Community
- Select "Desktop development with C++"
- Download and install Qt 5 binary installer from qt.io
- Install the Maintaince tool
- Select the following features to install:
- Qt 6.2.1
- MSVC 2019 64-bit
- ALL Additional Libraries
- Qt Quick 3d
- Qt 5 Compatibility Module
- Qt Shader Tools
- Developer and Designer Tools
- Cmake
- Ninja
- Qt 6.2.1
Linux
- Install dependencies for your distro:
# Debian/Ubuntu
sudo apt install build-essential libgl1-mesa-dev lld ninja-build cmake git curl pkg-config ffmpeg qml-module-qt-websockets qtwebengine5-*

# Fedora/RHEL/CentOS (yum)
sudo yum groupinstall "C Development Tools and Libraries"
sudo yum install mesa-libGL-devel

# openSUSE (zypper)
sudo zypper install -t pattern devel_basis
- Download and install Qt 5 binary installer from qt.io
- Install the Maintaince tool
- Select the following features to install:
- Qt 6.2.1
- GCC
- ALL Additional Libraries
- Qt Quick 3d
- Qt 5 Compatibility Module
- Qt Shader Tools
- Developer and Designer Tools
- OpenSSL 1.1.1.c Toolkit
- OpenSSL 64-bit binaries
- Cmake
- Ninja
- OpenSSL 1.1.1.c Toolkit
- Qt 6.2.1
MacOSX
- Download and install Qt 5 binary installer from qt.io
- Install the Maintaince tool
- Select the following features to install:
- Qt 6.2.1
- Qt WebEngine
- ALL Additional Libraries
- Qt Quick 3d
- Qt 5 Compatibility Module
- Qt Shader Tools
- Developer and Designer Tools
- OpenSSL 1.1.1.c Toolkit
- OpenSSL 64-bit binaries
- Cmake
- Ninja
- OpenSSL 1.1.1.c Toolkit
- Qt 6.2.1
- Install homebrew
- Open a terminal and install clang -> brew install llvm cmake ninja
- Change your default kit: QtCreator -> Options -> Kits -> Select your default kit (Desktop Qt 5.13.0) -> Change c and c++ Compiler to Apple Clang (x86_64)
Developer docs
We use qdoc to generate documentation. Qt6 is the minimum version qdoc, because of vastly improved c++ parsing support.
- qdoc.exe configWindows.qdocconf If you have installed Qt in a different directory, change the path to your Qt location.
Some useful links: